One of the most time-consuming aspects of creating a website or optimizing it for search engines is optimizing your images, yet it’s also one of the most important aspects of your SEO, especially if you’re a local service business like a landscaper trying to optimize your pages.
It shows your potential customers what your work looks like, gives visual representation to your content, affects the load time of your pages, and even helps you rank for relevant keywords. Your images are what gives your website depth and make it visually appealing. Your website needs images. But they cause your website to load slow and if they’re not optimized correctly, you’ll be missing on some important ranking factors.
Jump to A Section
- What Image Optimization Consists Of
- What Happens if I Don’t Optimize Images?
- Testing the Speed of Your Site
- How to Optimize Images on Your Website
- Correctly Size Your Images
- Compress Your Image
- Add an Alt Tag to Your Image
- Add an Image Title
- Add an Image Caption
- Summary
What Does Image Optimization Consist of?
It consists of a few things:
- Appropriate image dimensions
- File size
- Filename
- Alt text / tag
- Image title
- Caption
- Structured data markup (advanced)
- XML image sitemap (advanced)
- Open Graph Protocol and Twitter Cards (advanced)
We will cover all of the non-advanced items.
Two of these have to actually do with the size and dimensions of the image – that means you’re not going to just be able to upload your image from your iPhone. You’re going to have to upload it to a photo editing software. Don’t worry, we’ll get into this later and provide some free and easy options (or you can skip ahead to that section here).
The rest of them have to do with the metadata and file name of the image. Since search engines can’t “read” images, we provide metadata to tell search engines what the image is about or what it’s associated with. Search engines like Google take this information and categorize it in their database. That’s why it’s important to have all of the proper attributes associated with every image. The larger your content footprint, the more keywords you can rank for.
What Happens if I Don’t Optimize My Images?
SEOs like myself will cry around the world… or just shake our heads in disappointment.
It’s Going to Load Really Slow
But really, your site is going to load pretty slow. Aside from JavaScript, your images are pretty much always going to hold the bulk of the load time when it comes time for your page to load. But large images can cause pages to load longer than 3 seconds which causes an average of 53% of customers to leave. Since Google takes into account your website’s speed for ranking, large images that take a while to load can cause your ranking to drop, especially for mobile devices, which over 50% of searchers use, especially for local contractors.
Google Will Have Less Information to Rank You
Additionally, you’re not going to be able to rank as well for those quality keywords like “professional mulch installation in {your city}”. It’s great if you have content or header tags that already illustrate this, but it really sends the message when your images’ metadata reflects what your content is saying. It’s an added bonus to what your entire site is about when Google’s crawler bots crawl your website.
Your Images Aren’t Going to Be Proportionate
If you don’t properly size your images, they’re not going to line up with each other and they won’t look as professional. They might become distorted, zoomed in, or pixelated when you upload and place your image. If you’ve experienced this and get annoyed just thinking about it, don’t worry, I’m going to show you how to have a perfect upload every time!
Testing the Speed of Your Site
Testing the speed of your site is simple. But it isn’t just typing in your domain and timing how quickly it loads with a stopwatch. Even though the page may look loaded at first, there are still elements they may have not loaded in such as fonts, links, styles, or items below the fold (the fold is what you see without scrolling).
In order to test the speed of your site, you’re going to have to use a site speed tool. For site speed, I recommend the Pingdom Website Speed Test. This will give you an overview of what is taking the longest time to load as well as your page speed. Keep in mind, the speed you get is the speed for that particular page, not your entire website. If you want to audit more than one page for its speed, you’re going to have to test them individually.
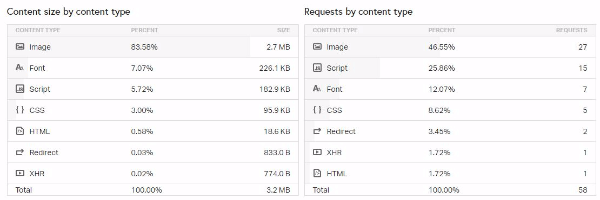
Another common one, and this is what I use to quickly audit sites, is the MozBar extension on Google Chrome. It’s free, so there’s really no reason to not get it and continually audit your site. It gives a lot of useful information immediately, such as site speed, H1, H2, and Alt tags, page meta descriptions and much more.
I finished this blog post and checked the page speed using MozBar and these were my results:
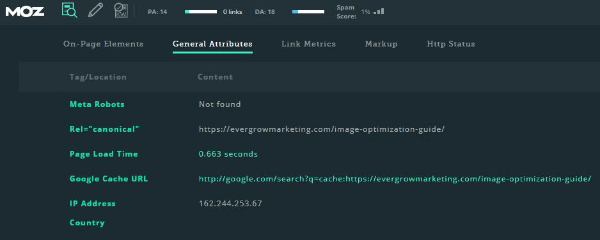
Not bad for a blog post that is heavy on the images…
How Do I Optimize My Images on My Website?
It’s simple, but tedious, especially if you have a lot of images. I’ll cover image optimization from start to finish in that order. I’ll lead you through a real-life example of uploading an optimized image since I’m working on a website build right now. However, there are a couple of more advanced image optimization tasks you can do such as creating an XML image sitemap or adding structured data, but we’ll leave those out of this post.
So without further ado, here is how you optimize images for your website.
1. Correctly Size Your Images
Without tools, this is just a guessing game. Fortunately, Google Chrome and Firefox browsers have extensions that allow you to drag your mouse and figure out exactly how many pixels you need. I use Firefox when I’m building websites (since it’s more secure) so I use the Firefox add-on Measure-it. If you’re using Google Chrome, my favorite measuring extension is Page Ruler.
Once you download your add-on or extension, you’ll be able to access it here (top right of your browser).

Step 1: Determining Your Image Size
The first thing I’m going to do is figure out what size I want my image to be on the page. After I click my Measure-it add-on, I’ll drag the cursor to the size I want for the image. In this case, I want my image to be 350px x 950px.

Easy. You’ve just figured out the size of the image you needed.
Step 2: Choose Your Image and Resize It
This is probably as technical as this process gets. You’re going to have to resize your image. Yes, you can just Google “free image resizer” and get tons of results for plug-and-play, one-page websites that can do this for you, but you also want to make sure your image doesn’t get distorted. For example, if I have a portrait image that I really want to use as a landscape image, I can’t simply reduce the sizes to get my 350px x 950px dimensions. Those dimensions in themselves are landscape orientation. That means we’ll also have to crop.
If you have Photoshop, good on you. If not, I recommend something like Gravit.
Once you go to their website, you’ll have to create an account (it’s free).

Then simply upload your image by dragging or adding the file in.
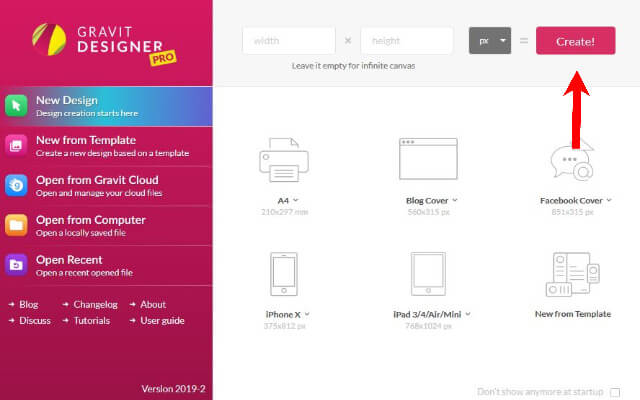
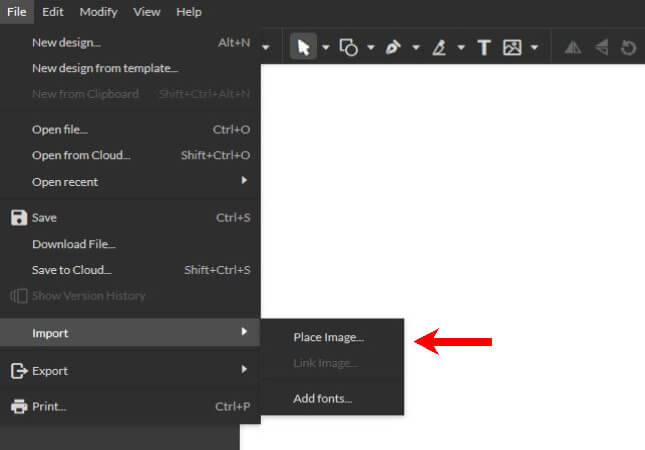
Next, add your image to Gravit by going to File –> Import –> Place Image.
When you place your image, it’s going to be off a little bit, just press the Center button and your image will be centered on your canvas.

Now, make sure the circle between the width and the height of the image is checked. This is going to make sure your image keeps its aspect ratio and doesn’t get distorted when you drop one of the dimensions down to what you need. In this case, we’re taking 1022px down to 950px on the width.
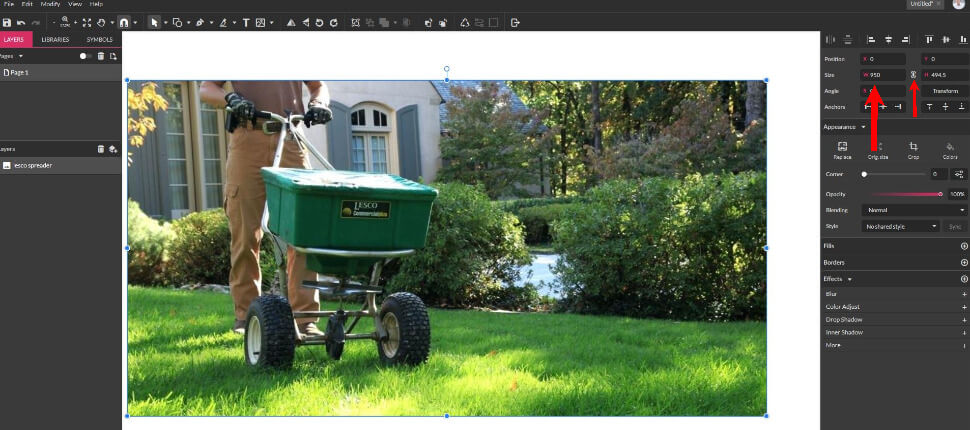
Your width is now your desired size, but your height is just a little off. In order to fix this without distorting the image, crop the image by double clicking on it (or selecting the “Crop” button under “Appearance”). When you double click on the image, you’ll be able to drag all of the sides inward to remove parts of the image. Do this to get as close to the size you need. In this case, we need 350px.
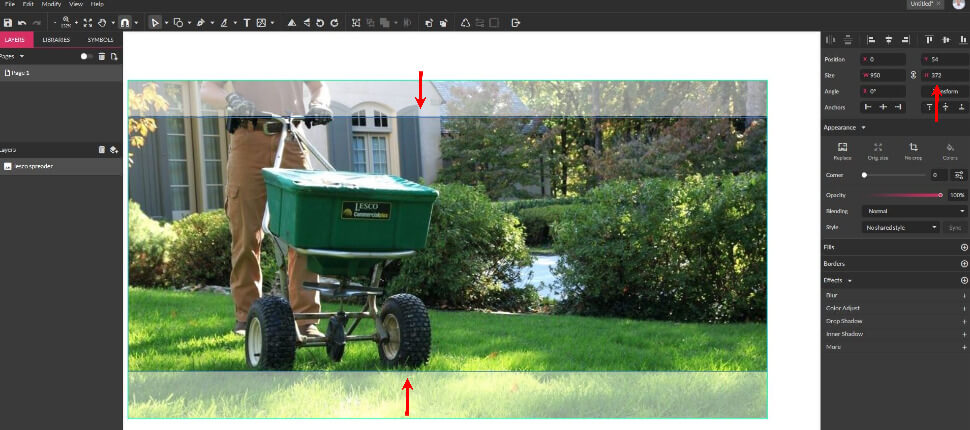
I wanted to keep the guy’s gloves in the photo as well as all of both wheels to the spreader. The closest I was able to get to this was 372px. That’s okay. Simply double click the image again to exit crop mode. Uncheck the dimensions link and adjust the height to what you need it to be (350px in this case).
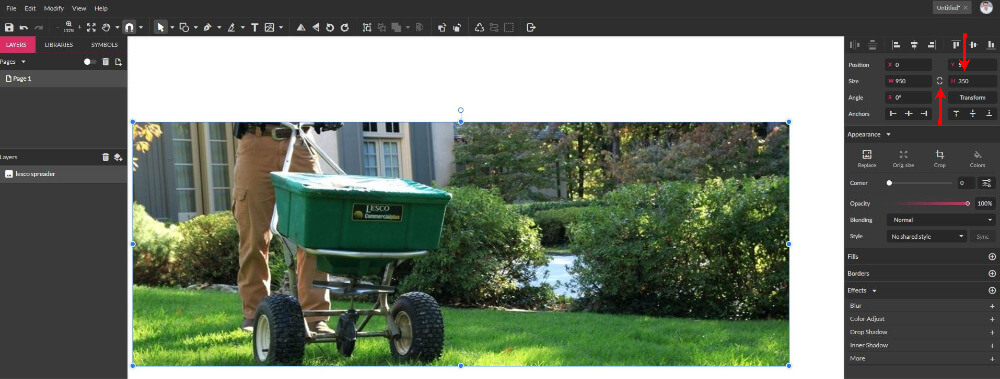
The image gets a little distorted when you only resize one of the dimensions. But that’s fine. The change was only 22px. Not enough for anyone to be able to tell anything is ‘smushed’.
Finally, export your image in a .jpg or .png file format. Typically, if you have a lot of colors in the image, jpg is the better format. If it’s a logo, something without a background, or just an image of grass with various shades of green, then a .png is your best bet. It has to do with how the file types are formatted. If you want to learn more about file types, you can check out this article. But try not to get too hung up on it. We’re going to use a tool soon that will automatically convert the image to the correct and most compressed format.
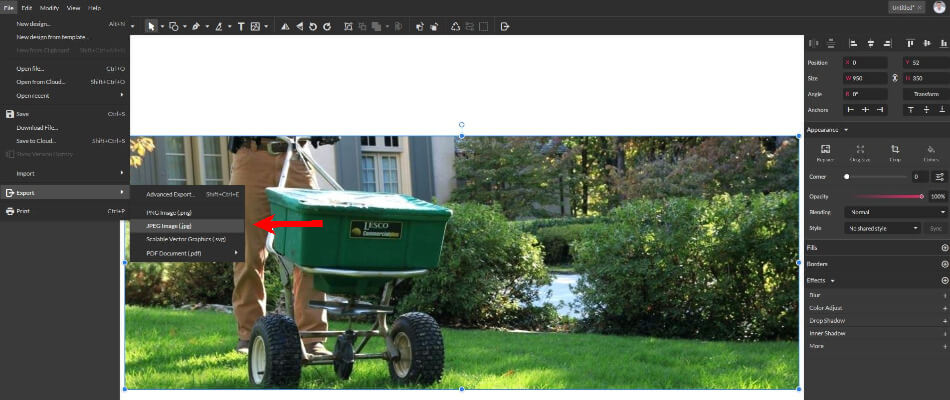
Step 3: Give it a Useful File Name
Save your image with a name that’s short and describes the image. I try to use something that is general and could potentially help you rank. For instance, instead of naming the file “man-with-lesco-spreader.jpg”, I chose to name it “professional-fertilization.jpg”
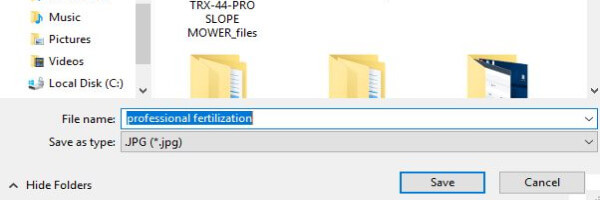
Since Google has said they take file names into consideration to determine what that image is about it’s safe to say it’s likely a ranking signal. “Professional fertilization” could be a keyword that a searcher could type in where you would be relevant to show up (versus “man with lesco spreader”).
Here’s what Google said on file names:
“Likewise, the filename can give Google clues about the subject matter of the image. For example, my-new-black-kitten.jpg is better than IMG00023.JPG.”
NOTE: It’s a generally accepted best practice to keep your image file names all lower case. Don’t title case them. Save that for the alt text and the image title. Your file name is going to be a part of the URL for that image. When dealing with URLs or UTM parameters, try to always use lower case. Databases that alphabetize file names typically do so in a case-sensitive fashion.
2. Compress Your Image
Your image has been saved with a useful file name and is sized correctly, but the quality of the image isn’t optimized quite yet – we still have one more thing to do before we can upload it to the website. We need to compress it.
Images have varying resolutions, similar to how you can change your TV from 720 to 1080 or even 4k. Images are the same way. We want to make sure that we have the “lowest quality” in the image without making the image pixelated. An image with a smaller file size has a lower resolution but loads quicker. The goal is to compress the image enough to where no one can even tell the image is compressed.
As of 2018, the average page weight is between 3 and 4MB, yet Google’s best practice for page weight is to have your page be under 1MB in data. If we didn’t compress that one image in the slider example above, we would have already exceeded Google’s best practice for the entire page size in that one image. Also, that one image would have been more than 25% of the industry average for total page sizes.
It’s a real eye-opener for how slow your website might be in its current state without optimized images.
Okay enough about what compressing images consist of, let’s get to how to do this yourself.
Step 1: Go to an Image Compression Site
I recommend tinypng.com or tinyjpg.com. They’re both free, but it doesn’t really matter which one you go to, they’re going to convert your image into whatever format it should be in for maximum compression (remember earlier when I talked about the difference between .png and .jpg?).
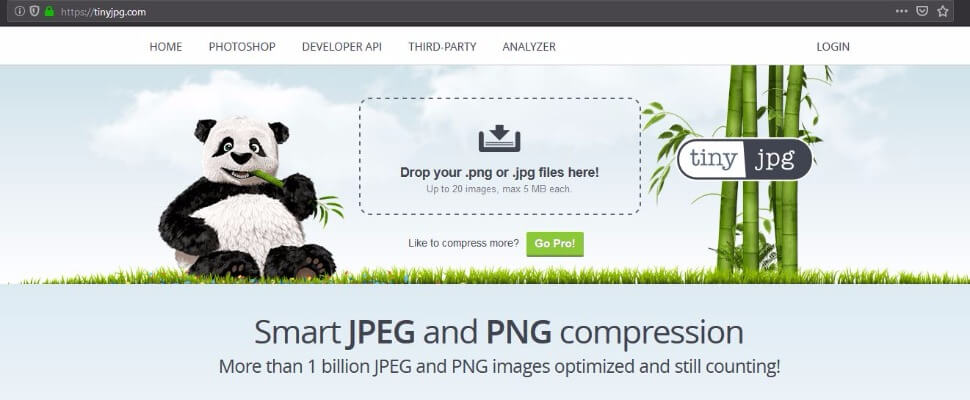
Step 2: Upload Your Image and Compress it
Upon upload, TinyJPG or TinyPNG will automatically start compressing it.
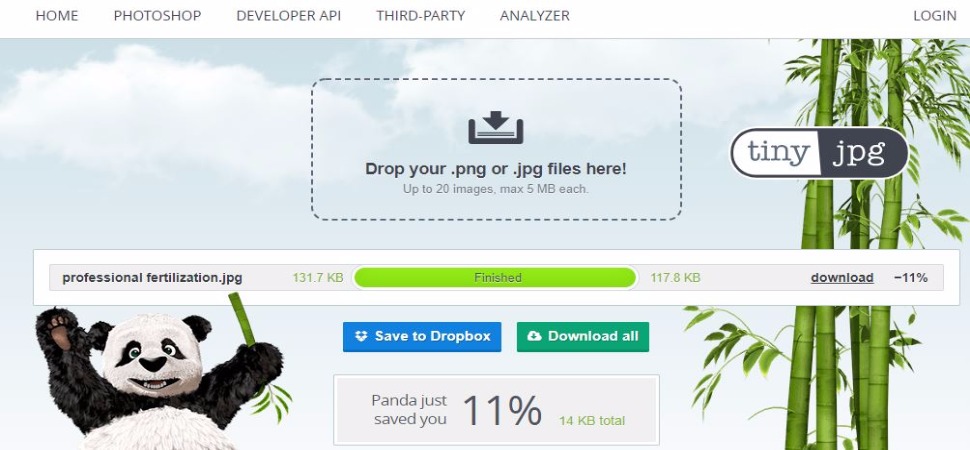
Step 3: Download Your Image and Save Over the Old File
Simply download the image by clicking download on the right side (NOT the green “Download all” button). The image will download to your browser, now just open the file and save it over your uncompressed file with the same file name.
Then boom, you’re done. You now have a fully compressed and properly sized image. The next step is to upload it to your website.
3. Add an Alt Tag to the Image
Alt tags (or alt text) is the primary source from where Google gathers information on what that image is about and how it relates to the content on the page. You want your alt text to be keyword optimized as if you were optimizing a page for search engines.
Here’s what Google says on alt text:
“Google uses alt text along with computer vision algorithms and the contents of the page to understand the subject matter of the image. Also, alt text in images is useful as anchor text if you decide to use an image as a link.
When choosing alt text, focus on creating useful, information-rich content that uses keywords appropriately and is in context of the content of the page. Avoid filling alt attributes with keywords (keyword stuffing) as it results in a negative user experience and may cause your site to be seen as spam.”
Let’s take a look at the same example we have been working on.
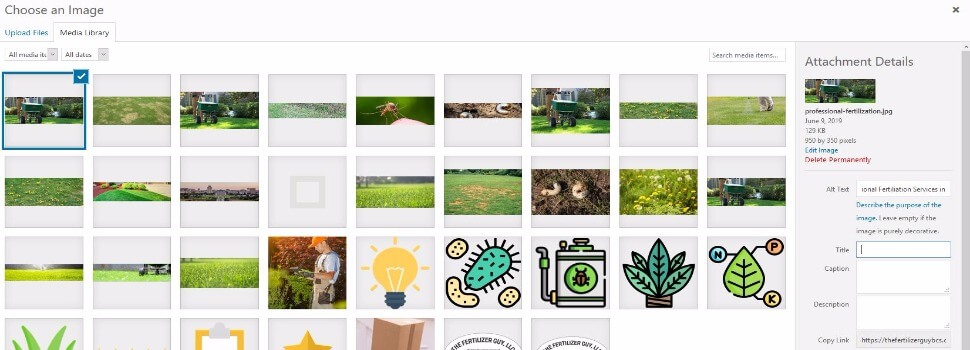
This is what it looks like when you upload an image to your WordPress website. If you’re still using Squarespace, Wix, Weebly, or any other locked platform, I advise you to move over to WordPress as soon as you can. Nevertheless, those platforms still have the capability for you to add these attributes. It’s just going to look a little different.
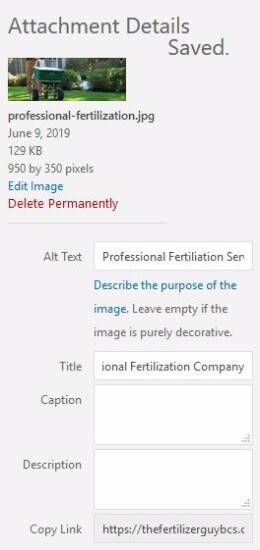
In this example, I uploaded the image we have been working on and gave it the alt text “Professional Fertilization Services in {City} {State}”. You should follow this example. You’re optimizing for both service-related keywords as well as including local keywords in there like your city and state (the state isn’t entirely necessary if your website and local SEO is optimized properly, but it doesn’t hurt).
4. Add an Image Title
Among the file name and alt text that Google takes into consideration when learning information about an image, they also take the image title. The image title is just going to be a brief, general phrase that describes the image. It should be short, similar to your image file name, but also different so you can expand on the context of what the image is.
In my example, I added the title, “Professional Fertilization Company”. You could argue that the title I chose is more of an alt text because it describes the content of the page rather than an objective description of the image. However, I prefer to think that a homeowner or fly-by-night, lowballer isn’t going to be using a Lesco spreader. Which is why I decided to go with the title tag that I did.
5. Add an Image Caption
This is one that a lot of people neglect. Mostly because captions aren’t as pretty. However, we’re talking about ranking better in Google here – and in turn, getting more leads. So let’s optimize for that.
Here’s what Google said about image captions:
“Google extracts information about the subject matter of the image from the content of the page, including captions and image titles. Wherever possible, make sure images are placed near relevant text and on pages that are relevant to the image subject matter.”
You want to caption your image naturally, as in if someone sees it, it won’t look out of place or unnatural. Here’s the caption I chose for my example:
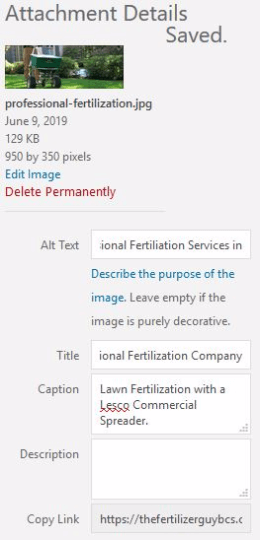
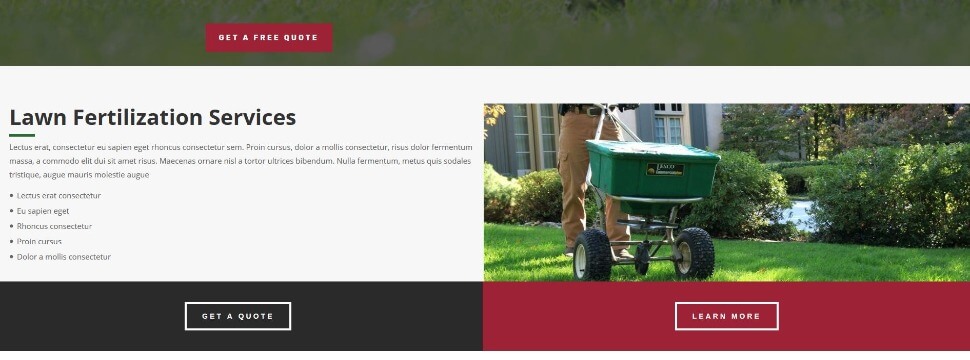
You’ve seen the captions throughout this blog post, so you know how they would look on your website. For this example, I chose to leave it off because the picture is more decorative, which is fine. I’ll have lots of opportunities to add captions to other photos throughout the site. But you do want to add a caption whenever possible. In my example, I wanted to make sure the bottom of the image touched the next row. You won’t be able to do that with a caption separating the two.
Summary
You’re finished! Hit the upload button and marvel at how good your image turned out. You have just increased the load time of your website and made steps to help you rank higher in Google.
Just follow these steps every time you upload an image (I know, it can get tedious):
- Pick your dimensions
- Resize and crop your image
- Use a good filename
- Compress your image in a compression tool
- Upload your image
- Add a descriptive alt text, title tag, and caption
If you have any more question on image optimization, feel free to reach out to me at jake@evergrowmarketing.com.
Happy optimizing!


0 Comments