
Facebook and any other social media platform will never be a replacement for your own website (and you can learn why here), but that doesn’t mean it shouldn’t be as optimized as your own site.
Believe it or not, Facebook is a search engine, and people do use it like Google and Bing to find businesses near them using specific keywords. Check this out:
I typed in “landscaper near me” in the search box and what I got was very similar to a Google search. Take a look at the Facebook search versus the Google search.
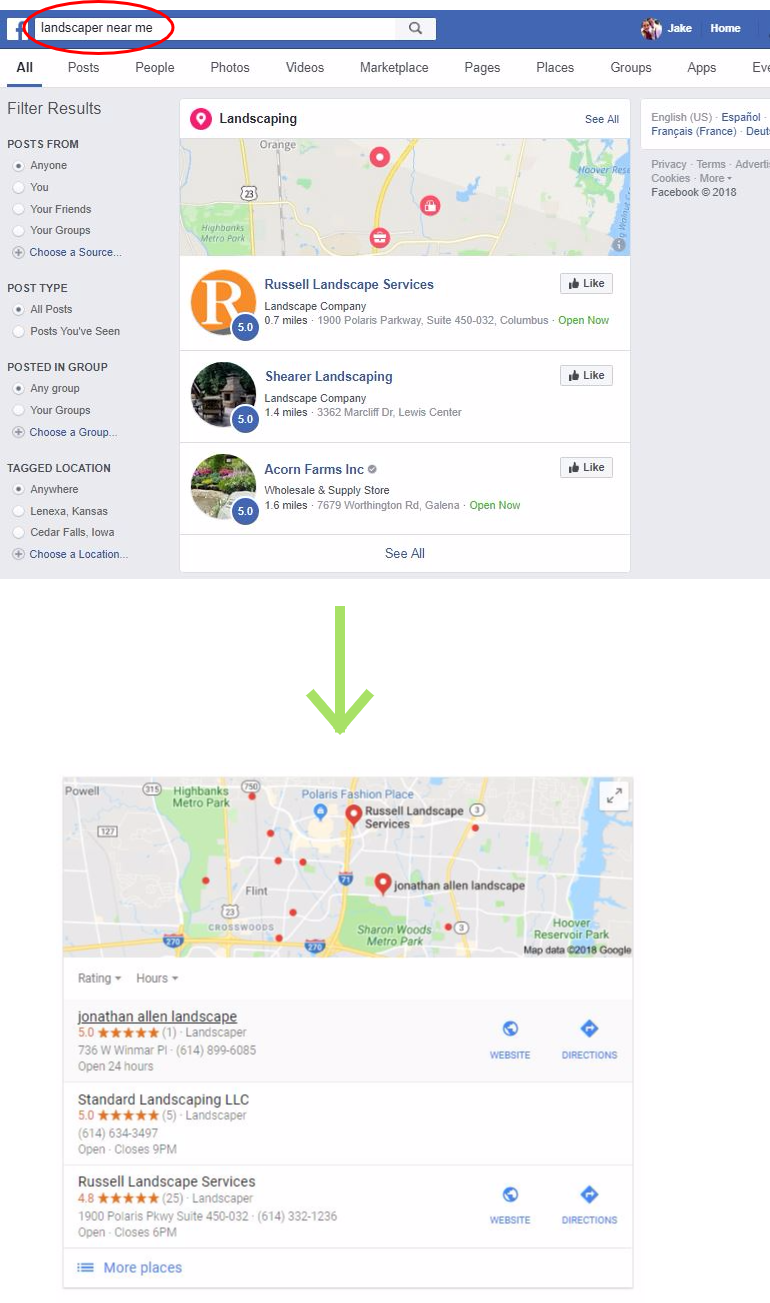
The Facebook Graph Search
First off, if you didn’t know you could do this on Facebook, well then you’re welcome. But back to the main point, both local listings look very similar, but they aren’t the same. And that’s the KEY!
That tells the algorithms both Google and Facebook use are different from each other. Google’s local listing combines on-page and off-page SEO with local keywords, citations, and links to determine local listing placing (among other things) that are more or less tied directly to your business’ website.
But Facebook local listings (AKA Facebook Graph Search) isn’t based on your website content. It’s based on your Facebook page ranking signals they have built into their own platform like review rating, proximity to the searcher, number of likes, etc.
High-Quality Customers with Professional Appearance
Let’s not forget the obvious reason you should optimize your Facebook page. Nothing is more of a turnoff than an ugly page or place that represents your business.
If a customer lands on your Facebook page and you have:
- a crude snapshot of an okay looking lawn with your name or logo pasted over it using Microsoft Paint
- a cover photo that’s too large and unappealing for desktop AND mobile devices
- or business information that is barely filled out
…it really shows the customer just how much you care about your business and your image.
In all honesty, it shows your business doesn’t just cut grass, it also cuts corners.
Now you know the ‘why’, let’s learn the ‘how’. Here are 13 things you should do today to optimize your Facebook business page to attract customers and get them to engage with your brand.
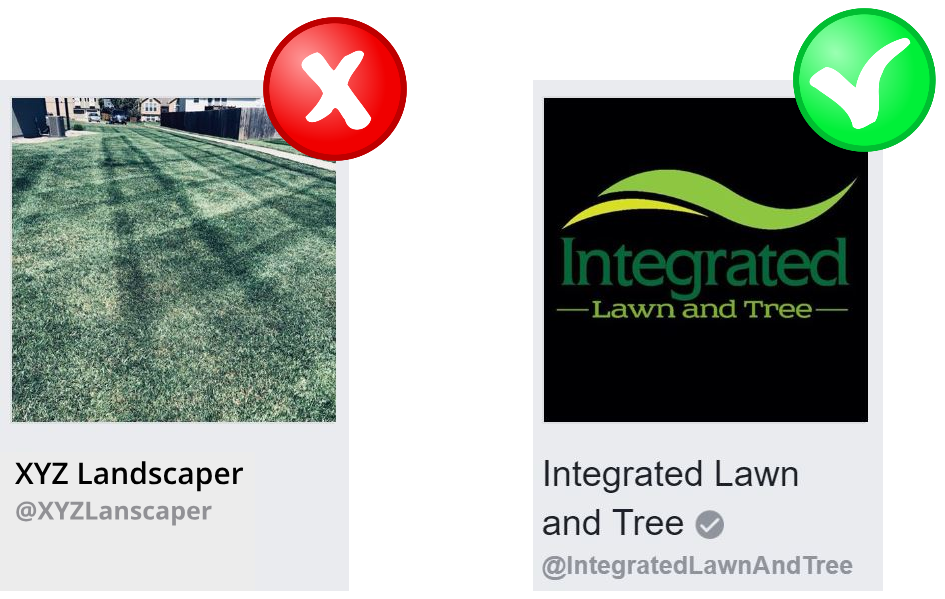
1. Professional Profile Picture
Think of your business page like your website. Just like you have to optimize your website for on-site SEO, you have to do the same for your page. And if you read my article on on-site SEO, you’ll know that on-page metrics are a ranking signal for search engines like Google and Bing.
Well, your Facebook page also takes into account on-site metrics when ranking your business listing within Facebook’s search engine.
A nice looking and professional profile picture in and of itself is not a ranking factor for Facebook, but it may make the difference between a customer wanting to explore more of your page and give you a like versus them leaving and looking for another landscaper near them.
How to Choose Your Profile Picture:
- Use professional imagery, logos, or illustrations
- Use your company logo in your picture
- Follow proper Facebook sizing guidelines
- Don’t use low-quality graphics or low-resolution imagery
And well, as we’ve already established, the Facebook Graph takes into account the number of likes and engagement you have. So the less professional you look, the less interaction you’ll get.
Lucky for you, we created this comprehensive guide to creating and posting professional Facebook profile pictures and cover photos for your business page.
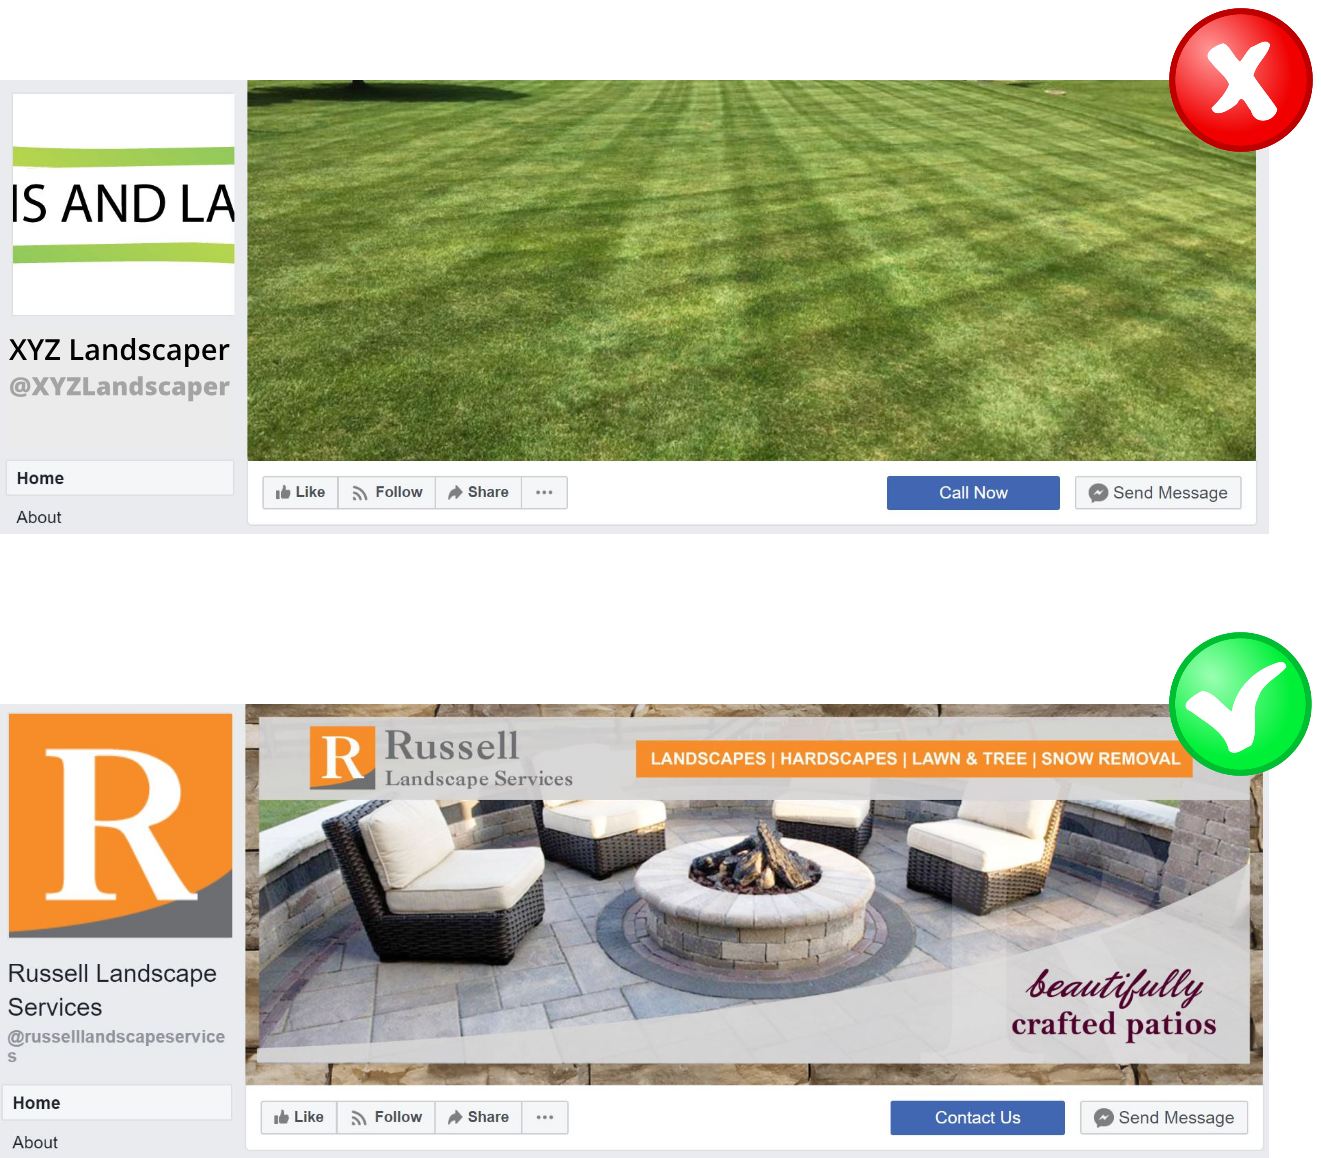
2. Professional Cover Photo
When optimizing for your cover photo, you essentially want to have the same things in mind when choosing your profile picture, but the main things to consider are the sizing recommendations and the messaging.
Notice that the Facebook cover photo is one of the first things a user sees when landing on your Facebook page so it better be important! Not only is it one of the first things, but it takes up some of the most real-estate on the screen on both desktop and mobile devices, which is all the more reason to have a nice image.
Don’t just throw something in there because you need something there. It shows that you cut corners and don’t care too much about your brand image.
Find or create a photo using free design tools like Gravit or Canva, or have someone professionally design a cover photo for you that fits Facebook cover photo dimensions. But also be mindful of the design. You don’t want something that is tacky or sloppy. So keep these 4 things in mind:
- Keep it simple
- Follow Facebook sizing recommendations
- Use professional imagery
- Provide a value message
I mentioned it above, but it’s worth mentioning again. We created a comprehensive guide on Facebook profile pictures and cover photos that covers all of these points in more detail. Just check it out in the link below.
Guide to Facebook Profile Pictures and Cover Photos for Your Business
3. Write Your Story
This can probably be a little confusing considering Facebook has a feature called “Stories”. That isn’t what I’m talking about. There’s also a section on your Facebook business page where you can share your business’ story, as in, how it came to be.
As far as we know, Facebook doesn’t constitute having a story a ranking signal but before we move forward we first have to understand our target audience on the platform.
Keep in mind, people aren’t on Facebook to shop. Although some do, the bulk of Facebook users are logged on to be entertained or pass the time by on their morning commute. It’s a social networking app between friends and family, you know, a networking app between entities that have personalities…
So where’s your business personality? This is where your story comes into play.
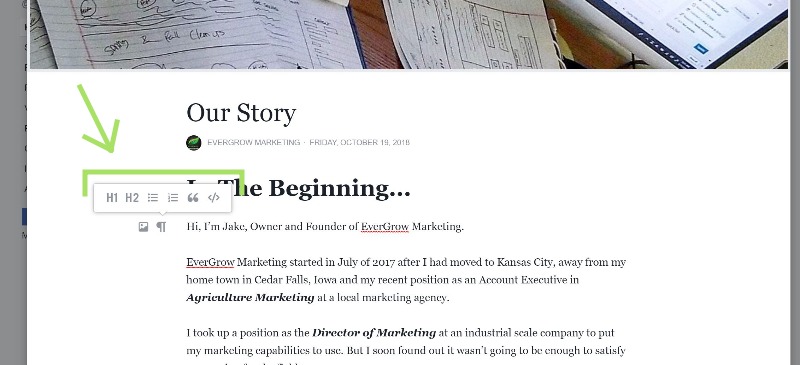
First off, this is where your story is located on your page:
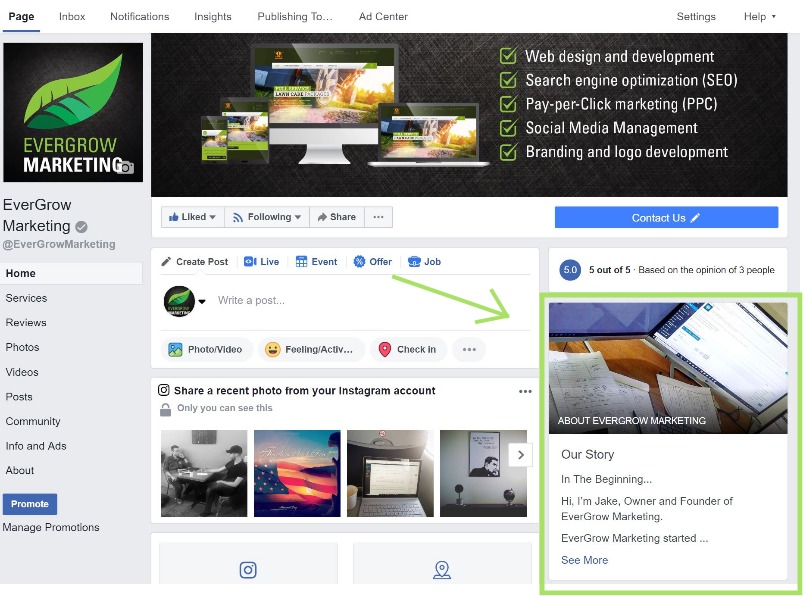
Simply click on “See More” and you’ll be able to click edit and start writing away.
Here’s the problem I see with most landscapers’ stories… They’re crap. They are a few sentences or even a couple paragraphs that outline what the company does and incorporates its mission statement.
That isn’t what this section is for.
This section is to TELL. YOUR. STORY. It should incorporate your mission statement and values, but not be centered around them. This is your opportunity to let your customers know that there is a personality behind your brand.
Because business is no longer B2C, it’s H2H (Human to Human).
This section should be like a blog post about who your company is, it should answer the five questions:
WHO started it?
WHAT is it that you plan to accomplish with your business (think big picture)?
HOW did your business get started? And how far has it come?
WHEN was the first day it was in business and what was it like?
WHY did you start your business?
If you didn’t answer all of these questions when you wrote your story, then start over. A business page with a weak story is a business with a weak personality.
“People may not remember exactly what you did, or what you said, but they will always remember how you made them feel.” – Maya Angelou
And make sure you utilize the text editing features! Use links, bold keywords and phrases, italicize and underline important things, use bulleted lists, help your reader understand EASILY who you are and what you’re here for. You can check out our story on our Facebook page to get an idea of how you could write yours.
4. Name, Address, Phone Number (NAP)
If you’re up-to-date on SEO best practices and have read our post on local SEO, then you should know the value directory and NAP citations hold with your business. Though, all too often I see landscapers and other contractors not putting their full business contact info on their Facebook page.
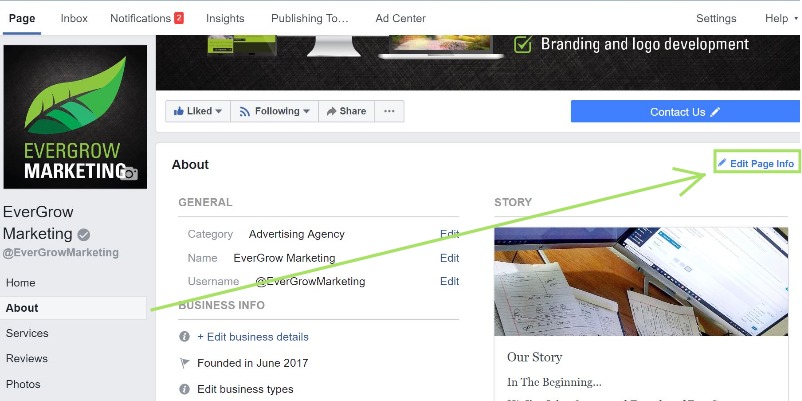
NAP stands for Name, Address, Phone and it’s an essential list of contact information any directory or citation site will have for your business. And wouldn’t you know it? Facebook has a place just for this right in your About section. Just head over to that tab and “Edit Page Info”.
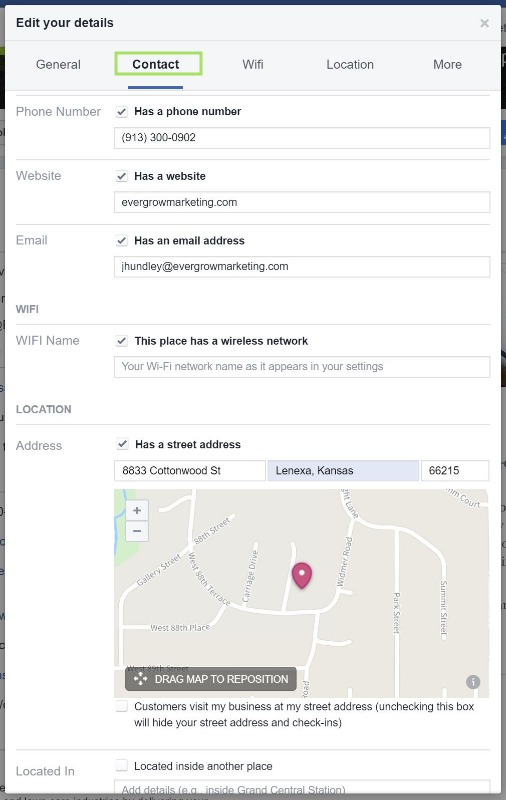
Once you’re there, the next step to update your NAP information is to head over to the “Contact” section. You want to make sure you have all the possible contact information filled out here including your address.
Don’t worry if you don’t want customers seeing this, it is just for the citation. You can uncheck the box under the map to not show your address to customers. The more info you have, the better. But you want to make sure that whatever you do, that this info matches ALL of your directory citations (Yelp, Angie’s List, Google, Bing, etc) or else you may not get credit from search engines like Bing or Google for the search engine listing of your website if discrepancies are found.
It’s not just important for your website rank or for Google’s sake that your business listings and NAP citation data is correct, customers actually care too!
A study by BrightLocal found that 68% of customers stopped using a local business if they found information to be incorrect or out of date in online directories, and guess what. Facebook is an online directory.
5. Optimize Page Description and Categories
These two are probably your most important things to update. The only reason they’re not listed first in this list is that they should have already been done when you created your page, but they are worth circling back to and reassessing.
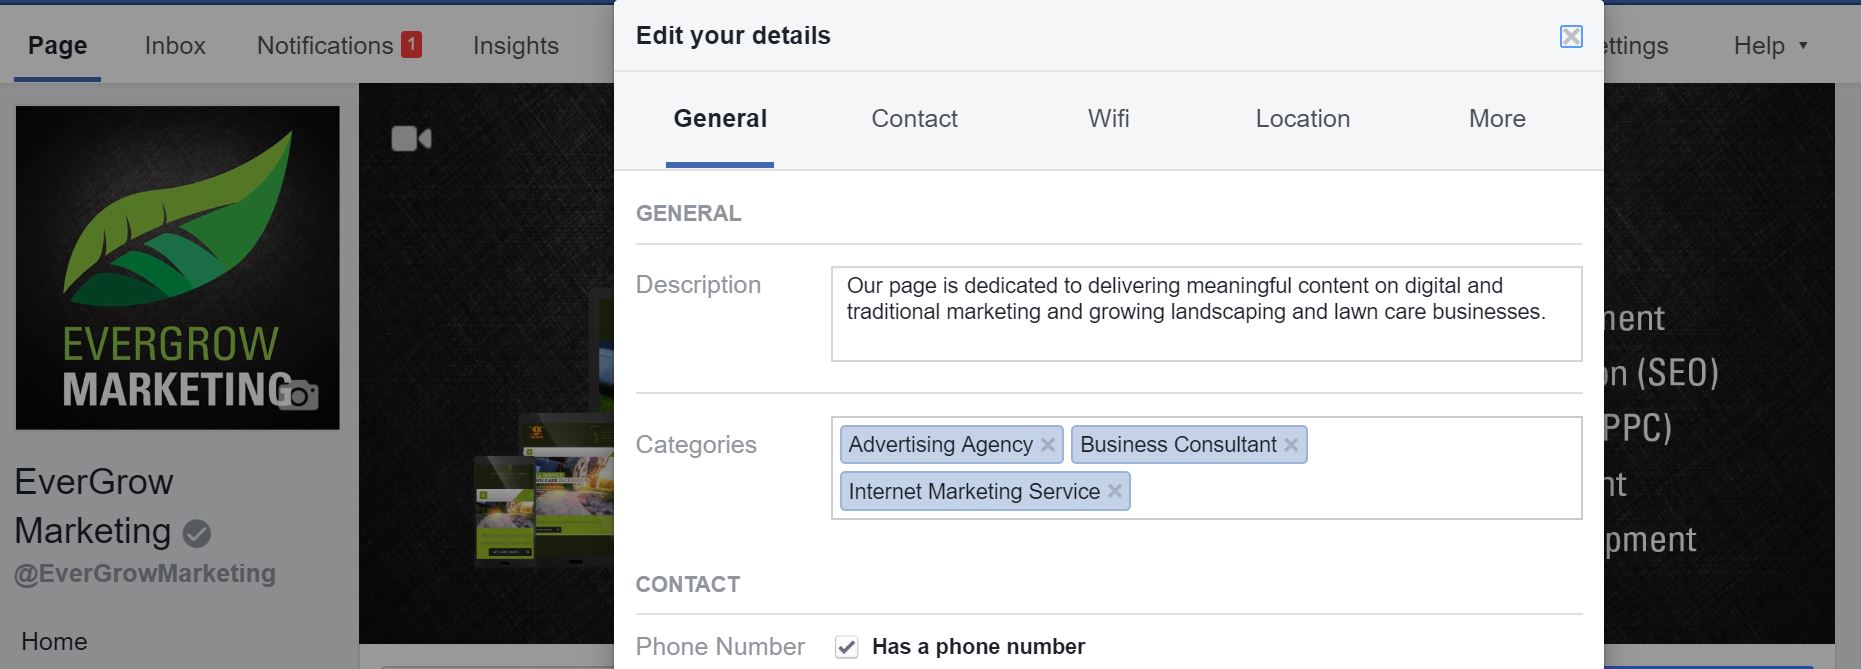
Your page description is going to be a short description of the purpose of your Facebook page limited to 155 characters. This is NOT your mission statement or a description of your BUSINESS. This is a description of the purpose of your PAGE. See ours below for an example. There is another section where we’ll talk about your business itself, so hang tight.
The next things are your business categories. These are important, these are how Facebook categorizes your business in the platform. If you’re a landscaper, and you only have “Contractor” in your categories, guess who isn’t showing up on Facebook as a landscaper?
You can only have three of these categories, so choose wisely. Since every landscaper’s business is different in terms of services they offer, these could be all over the place, so my advice would be to start typing something in that describes the work you do and see if that is a category.
Google updates their categories for your Google My Business listing every-so-often so this section is worth coming back to see if there are better categories. The three I would recommend for a landscaper (as of now) would be:
- Landscape Company
- Contractor
- Gardener (maybe)
6. Update Company Information
There’s a lot of miscellaneous stuff that needs to be updated in regards to general business information, so I’ll cover each thing fairly briefly. But the main point to this is you don’t want to come off as lazy when it comes to filling out your company info. Customers can see what you have and have not filled out. If your customer is in a rush, they’re not going to have the time to do more research than the platform they discovered you on. In this example, that is Facebook, so give them all the information you can!
Company Overview
Your company overview is going to be a little bit more impersonal as it’s simply a statement of what your company is and what it is you do, similar to a mission statement. This can get a little confusing considering you already have a “company story” and “page description”.
So we’ll set the record straight.
Page Description
This is where you briefly talk about the purpose of your Facebook ‘page’, not your company. Why does your Facebook page exist and how are you using it?
Company Story
This is your company history, setbacks, milestones, beliefs, and what makes your company YOUR company. It should be long form, full of links, and structured in an easy, readable format.
Company Overview
Finally, this is just a description of what your company does. Strip away all of the fluff and feel good crap and tell your customer exactly what it is your company does.
Additional Company Information
You’ll also find a lot more minor information to complete on your page such as the year your company was founded, your available hours, any awards you may have received locally or through NALP, and your privacy policy on your website.
There are even places to add links to your website and other social media accounts like Twitter and LinkedIn. The more complete your company profile looks, the more professional your business looks, and who knows. Ideally, you’d think Facebook favors business pages with more complete information in their search engine…
7. Show Relevant Page Tabs Only
This is where you want to treat your business profile page as your own website. Your page has its own links to other sections of your profile underneath your profile picture and these can be changed. With that being said, it’s important to display only ones that are relevant to you.
If you don’t have notes, don’t have a Notes tab. If you’re not running offers, don’t have an Offers tab. Of course some of these you can’t remove, like “Info and Ads” and “Posts”.
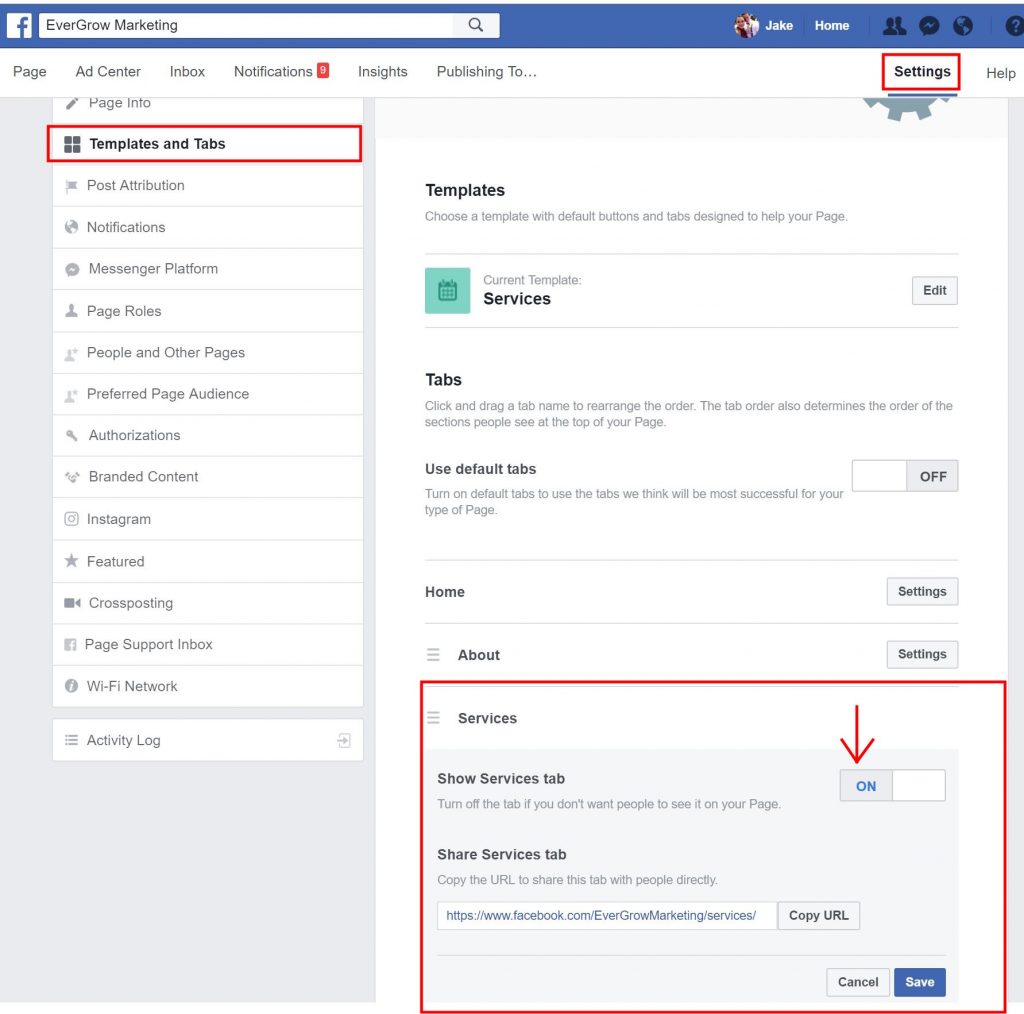
To edit these tabs, head over to your page settings and click on “Templates and Tabs”. From here, you can select template themes for these tabs with pre-loaded tabs, or completely modify them yourself.
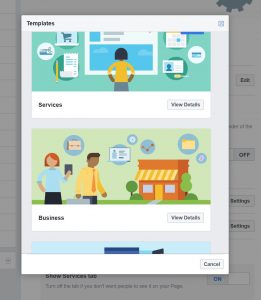
Once you select your template, you can remove the tabs you don’t want and add some that weren’t included on that template, like below:
For a landscaping or lawn care company, I recommend utilizing the following tabs:
- Home (Can’t remove this)
- About (Can’t remove this)
- Services
- Reviews
- Photos (Can’t remove this)
- Posts (Can’t Remove this)
- Videos (Can’t remove this)
- Community (Can’t remove this)
- Info and Ads (Can’t remove this)
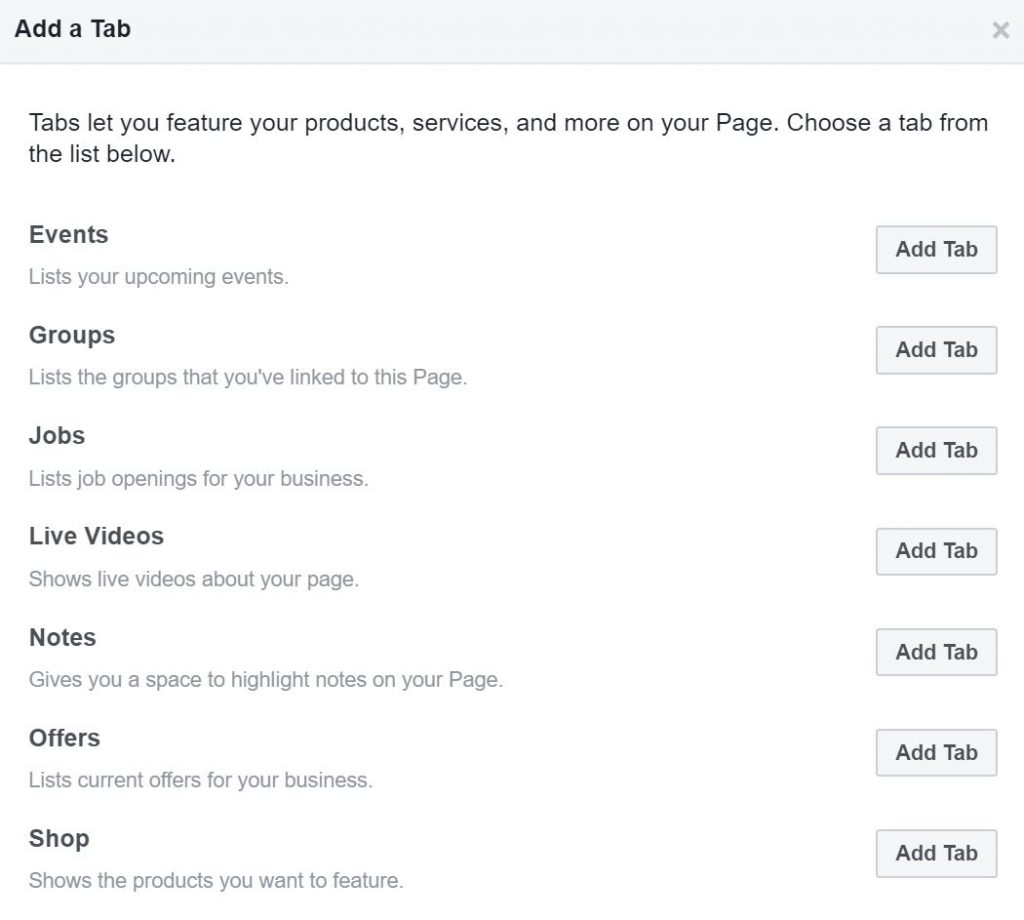
There are obviously a lot you can’t remove, but you can still reorganize them and remove all the unused fluff. The problem is you don’t want your tabs to become too cumbersome, so it’s best to limit what you have. If you’re hiring, put a “Jobs” tab up. If you do a lot of live videos, show a tab for that.
Here’s a list of the different tabs you can add:
8. Add Services with Images
Since we’re on the topic, when you add your “Services” tab, don’t just list out one service you offer or explain what your business can do. I see this way too often. If that is what this tab was for then we wouldn’t have covered topics five and six in this article so extensively.
Your services tab should reflect the individual services you offer. This is going to give the customer a clear expectation of what you offer in an itemized list. Almost 90% of customers research online before making any kind of purchase, so if your page isn’t giving them the information they’re looking for, your competitor’s might.
Here’s how to optimize your services:
List Out Each Service
Create an individual service for each thing you offer and name it something your customer understands. For instance, you may want to call your bush hogging service, “Brush Clearing” if that term is more commonly used with your customers.
Give a Detailed Description of Each Service
You have 600 characters to use when describing your service, so use them. The more info you give, the better your potential customer feels informed to make a decision. Let your Facebook page be a sales rep.
Use an Appealing Image
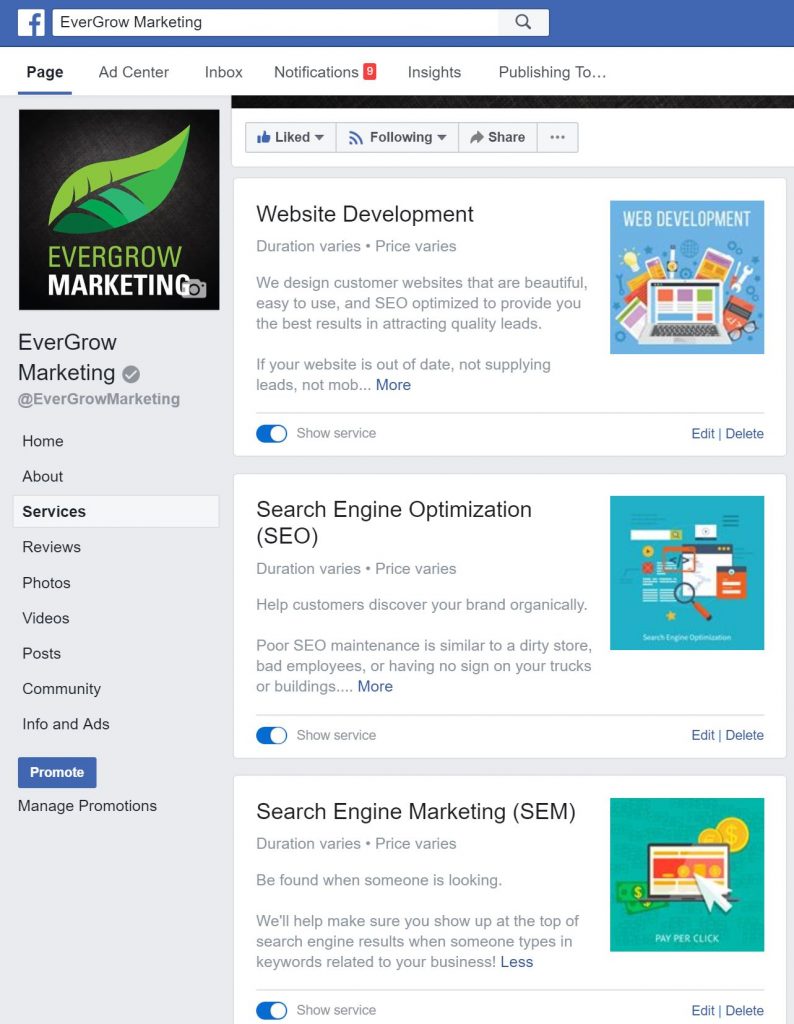
It’s always best to use a professional image or an example of work you’ve done with that service. The use of good images has been proven to boost conversion rates.
Here’s an example of how we have our services listed out on our business page:
One thing to consider: Services have an optional field for price. Although listing your price outright sets the pricing expectation with your customer before they call, it can also do two things:
- It can create false expectations. Since most of your costs are likely based on labor rates and materials, no two customers are the same when quoted. One customer may have a 5th of an acre plot with no obstacles while the next door neighbor has the same yard size but with trees, trampolines, and fencing. Setting pricing could be setting you up to do some explaining to a customer after an invoice.
- Competitors can see it. It doesn’t seem like a big deal at all, because if a competitor wants to know your pricing, they’ll find ways to get it. However, since almost all jobs are a bid versus a flat rate, it could be easy for a competitor to see how you bid and consistently underbid it.
My advice would be to leave your pricing out of it. But I’d love to hear your thoughts in the comments.
9. Get Your Facebook Page Verified
You may have noticed some business pages have a gray check mark next to their name, just like in the examples above. That gray check mark is essentially an authentication mark with Facebook and lets users know you are who you say you are. It’s basically the same thing as ‘claiming’ your business with Google My Business or Bing Places.
One of the benefits of having your page verified is increased Facebook search visibility. Remember when I mentioned at the beginning of this post that Facebook is a search engine? Well, being verified is a ranking signal in that search engine. It also just looks more official and professional.
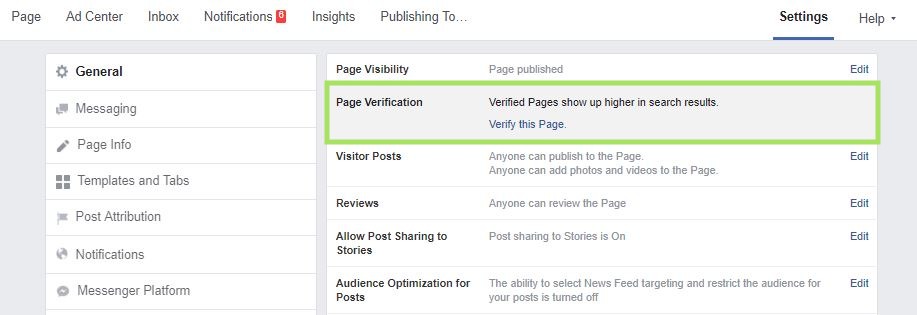
To get your page verified, simply go to your page settings and click on “Page Verification” under the General tab.
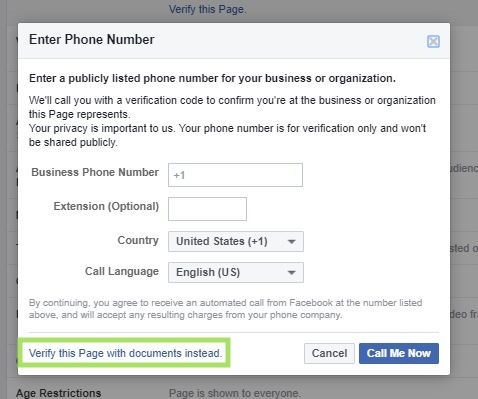
Simply, click “Verify this Page” and you’ll be prompted to enter in your business phone number for a verification code you’ll need to verify on this page. Here’s the catch though, the phone number has to be a publicly listed phone number for your business. This prevents people from creating a fake business page and verifying it. After all, it is a ‘verification’ step.
If you’re new and just starting out and don’t quite have a business phone number that’s publicly listed or don’t have your Google My Business or Bing Places verified with the same phone number, then you can follow the steps to verify your business page with documents using the link at the bottom of the prompt.
To verify your Facebook business page with documents, just upload any of the following documents:
- Business utility or phone bill
- Business license
- Business tax file
- Certificate of formation
- Articles of incorporation
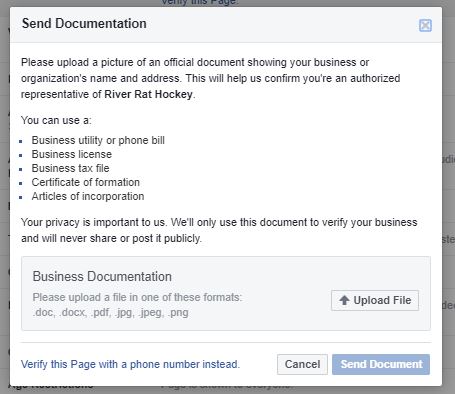
Once you upload the documents, Facebook will review them and either approve your verification or deny it within a few days.
10. Setup Auto Replies and Away Messages
Yes, you can set up auto-replies, away messages, and greetings with your Facebook Messenger app. These are incredibly helpful simply because of the fact a lot of owner-operators such as yourself aren’t always looking at your phone. Sending an auto-reply like,
“Hi <insert name>, we’re currently out in the field right now, but we’ll get back to you as soon as we can!”
…is more than enough to let your customers know you care about getting back with them swiftly.
If you value a strong work/life balance and operations cease at 6:00 pm, then you can set away messages and let your customers know you are currently closed and will open up tomorrow at 6:30 am. Receiving a message during these times won’t affect your response rate metric either. But we’ll get to that shortly.
Finally, set up greetings for your Messenger app to open up right when a customer lands on your business page. We currently have ours set to open up and prompt with a simple, “How can we help you today?”
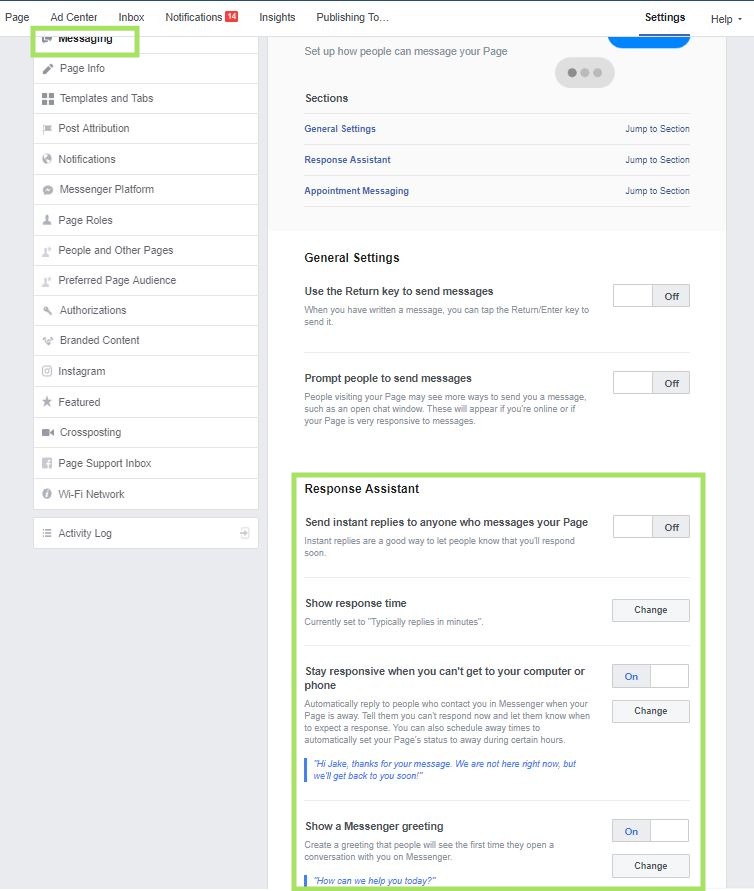
All of this can be easily setup under your Messaging tab in your page settings and modified under the General Settings section.
11. Respond to Messages Quickly
You may have noticed some pages have a response rate badge under their Story on the right hand side on desktop or just under their reviews or events on mobile. It looks like this:

The faster you can respond the better. And you should have a 100% response rate, even if it’s a troll or you don’t think it’s authentic, respond anyway with this rating in mind.
The reason why this metric is important is that social media users typically expect a response within an hour, any longer and they could be asking your competitor the same question. So keep the response time low. However, setting up auto-replies and away messages does NOT affect response times. What I mean by that is you can’t simply place an auto-responder and expect your response times to be instant. These are not factored into your response time metric, so be diligent!
12. Post Regularly
Optimizing your Facebook page up until this point has been a series of one-offs. Things you have to set up one time to have a professional appearance. But an optimized Facebook business page doesn’t stop being optimized. Facebook cares about engagement and how its users are interacting on their platform. If your business page isn’t producing engaging or meaningful content, Facebook sees no reason to rank your new posts in users’ news feed.
Additionally, if you’re rarely posting on Facebook, your business looks dull to a customer who is visiting your page. Facebook is a community and when your page doesn’t look active, it looks like your business doesn’t want to participate in the community.
There are no shortage of ideas for posts you can make, including holiday updates and shares, recent blog posts and articles, pictures of your recent work, team member appreciation posts, or even funny, industry-related comics and memes work well. Try to keep the promotions limited. There’s no need to make every post an ad. It actually turns people off.
If you’re looking for an idea on how often you should post, check out this guide I wrote on how much you should post on different platforms.
13. Respond to All Comments and Reviews
One of the number one things you can do to gain exposure with Facebook’s news feed algorithm is simply to respond to all comments on all of your posts, even if it’s a simple emoji. If someone responds to a funny lawn care meme you posted and just says, “LOL”, respond with a laughing emoji. The more comments and likes you get, the more your followers are likely to see your posts in their news feed.
Although it has nothing to do with ranking, responding to 100% of your reviews is huge, regardless if they’re good or bad. If someone leaves a positive review, don’t just like it. Reply to it and publicly thank them. If you can, mention something personal to them and their account, like “Thank you <insert name>! We absolutely enjoy having <dog’s name> supervise us while we take care of your lawn!”
Simple things like this go miles when a new customer is looking into your brand for service.
…But now let’s look at the other end of the reviews. Negative reviews. You’re going to get some of these no matter what business you’re in. Some legitimate, some trolling, some competitors. It’s important to respond to all of them no matter what.
If it’s a troll, apologize for their experience or their rating, but also politely make mention that you don’t have any record of service with them and to have them reach out to you.
If it’s legitimate, well, treat them as a normal dissatisfied customer. The only difference here is that it will be public so everyone will be able to see your exchange. Remain professional! Apologize and address their concern. Offer to reconcile if you can. If you cannot, let them know you are taking measures within your own company to correct the issue from occurring in the future and you value their input.
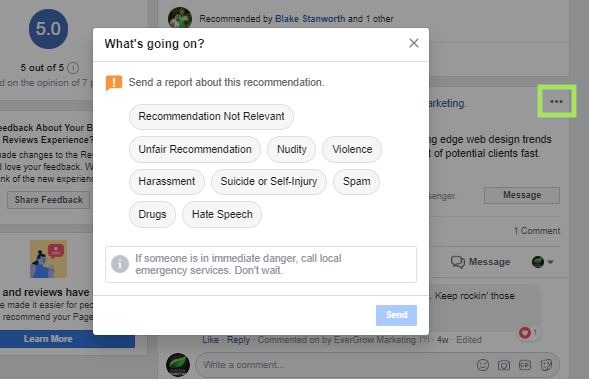
With that said, fake Facebook reviews can be removed. Any review left that doesn’t adhere to their reviews and recommendations policy can be submitted for review. All you have to do is go to the review that is fake or spammy and report it using the three dots in the top right of the review.
Managing your online reviews on search engines, directories, and other social media is a whole other topic, but this should get you started on managing your current Facebook reviews and future ones to come.
What are you waiting for?!
You now have a complete guide on how to optimize your business’ Facebook page, so there are no more reasons for you to have an unprofessional looking page whether you have your own website or not. The trickiest parts are finding your creative juices to write your own content or create your own professional looking profile picture and cover photo.
That’s what we’re here for! If you want to keep focusing on running and operating your business, we’re more than happy to help you manage everything from optimizing your social media pages to constant SEO and website improvements to running and managing your Google and Bing ads for those immediate and quality leads in your market!
0 Comments